 Day One Fixes
SolvedHow-toUpdated
Limbus Company: (OUTDATED) MD 6 Achievements Guide and EGO gift graphics
Short answer
A look at the new Mirror Dungeon 6 achievements, in both Normal and Hard mode. Explanations, tips, and walkthroughs. This guide also includes general graphics to better help plan runs around status EGO gifts. WARNING - Content No Longer In Game After February 19th Update
Steam Community guide by ChaosComposer.
Intro and Important Notes
New Guide for Mirror of Name And Spiders will be posted here when applicable
https://steamcommunity.com/sharedfiles/filedetails/?id=3683364835
Welcome to the Mirror of Immortality. With new Achievements being phased back into runs, let's go over some best practices to help you get those clears!
I will be continuing to update this guide as new achievements are added. Some of this will be a bit copy/paste from my old guide, but updates have been made where necessary.
A few disclaimers - not a full guide to how to play Mirror Dungeon itself; the EGO gift images here are meant to be quick references (ie, no names are shown). For a full breakdown of what Mirror Dungeon is, how it works, and what EGO gifts do, check out Borderlined's suite of guides:
https://steamcommunity.com/sharedfiles/filedetails/?id=3526253064
Like my last guide, I will be attempting to explain how to do these achievements in Normal Mode, wherever possible. However, there do seem to be more achievements that may require Hard Mode this time than there were last time. Even still, by the end of achievement rollouts, you should be able to claim the decaextraction ticket prizes without playing Hard mode if you so choose.
Important Notes:
For most of these achievements, you have to Claim Rewards on a run for the achievements to count as complete!
Spending Starlight is one way to make many of these achievements much easier!
I have been dreading how to deal with this. In general, you won't need starlight to accomplish most of these achievements. That being said, if attempting to double dip or make up for potential bad RNG, having a good amount of starlight will be VERY helpful - I doubt there will be a reason to hoard starlight, so don't be afraid to use it to make things easier for you!
Clears Overview
Most of these are the same as we had in the previous mirror dungeon, and are self explanatory. There are a few categories here -
**- Clear the Dungeon at Floor 5 or above X Times (Up to 50)
- Clear the Dungeon at Floor 5 or above X Times in Hard Mode (Up to 15)
- Clear the Dungeon at Floor 10 X Times (Up to 10)**
All of these speak for themselves. Asking 10 floor 10 clears instead of 1 is a big difference though, so it certainly encourages playing deeper into the run more than once.
If you are a new player and do not have many IDs leveled, make sure you are using the Rental Teams! They are a bit limited in what they can do, but they will be a great way to double-dip with status achievements. They also are always max level, max uptie, and max EGO uptied as well - so be sure you are running them on Hard mode so they count towards the 15 clears you need!
There are also a few Theme Pack achievements that are new as well.
- Clear 6 Refraction Railway Theme Packs in a single Run
This one is sneaky hard. The first time a Railway pack is available is floor 4. This means you MUST take a Railway pack on EVERY floor besides one, from 4 and above. Additionally, you only have 6 packs to choose from, so you MUST do all of these. These packs can be pretty brutal, so I would definitely recommend spending some starlight to help boost your power level and ego gifts as much as possible. If you start at floor 4 and never skip one, you will end after Floor 9 (but at that point you should just finish the run for other achievement progress.)
On Floor 4, choose or search for Line 2: Mobius. It is currently the only railway pack that, for some reason, is not available on Floor 5+.
On Floors 5-10, choose or search for one of the following packs. You can do them as they come up, or if you don't mind the possibility of rerolling things, doing them in descending order of release may be beneficial, as lines 4 and 5 can already be quite tough, fighting the envy peccatulum within with as few mounting trials as possible might make the difference.
- Line 5: Merry Go Round
- Line 4: Masquerade Section 4
- Line 4: Masquerade Section 3
- Line 3: MirrorClock OrangeRoad (If you have a Sinking team/gifts, you might consider moving this one earlier in the run as well.)
- Line 1: MADNESS
Final new one to talk about:
- Line 1: MADNESS
- Clear 8 Canto Theme Packs in a single Run
This one also requires a good bit of planning. Canto-themed floor packs are not enough, they must be named after the canto. Stick to the following layout and you will be fine:
Floor 1: The Outcast
Floor 2: The Unloving
Floor 3: The Unconfronting
Floor 4: The Unchanging
Floor 5+: Choose From
The Evil Defining
The Heartbreaking
The Dream Ending
The Surrendered Witnessing
It may be beneficial to attempt doing the more recent canto packs earlier, before enemies get too strong.
Optimizing Runs
A quick aside - we will need to do 10 Floor 10 runs to obtain all the achievements anyways, so it is totally reasonable to take each of these challenges one at a time.
However.
Because burning starlight makes a lot of things much easier, it is also a good idea to consider attempting to finish as much as possible in each run that we spend a ton of starlight on. For that purpose, we can double dip these achievements with some of the Tier 4 EGO gift achievements in the next section. If interested, check out the Advanced Combo runs section of the guide.
Collection Overview
This tab of achievements is split into 2 categories once again: unlocking a certain number of gifts/theme packs in your collection, and actually finishing a run with up to X number of certain ego gifts, both status and tier 4.
(You also have to finish with 30+ ego gifts of any level, but this one is going to be completed on accident in most cases especially with a deep floor 10 run)
We'll deal with the first category first as it as the most straightforward.
First off, to find new theme packs, the theme pack search function lets you spend a small amount of starlight to choose any valid theme pack you want. You can use this, along with starting graces that give you rerolls, to easily complete the Theme Pack collection achievements.
Secondly: when starting a run **if Activate EGO search is on, you can start with any 3 EGO gifts at Tier 3 or below, even if you have not unlocked them yet. **
Because EGO gifts are added to your collection as soon as you pick them up, you can start a run, select 3 ego gifts you have not unlocked yet, and then abandon the run. This will add them to your collection but WILL NOT use up your starlight. You can repeat this method, if you wish, to fill in any missing gifts you do not have yet below tier 4.
You can use this same method for fusion gifts that require 3 or fewer tier 3 or lower gifts, by selecting the 3 ingredients, playing to the first shop, fusing the item, and then forfeiting.
15+ Status Gifts Overview
One of the few cases where these achievements actually became easier to do in normal mode than they were before. This is because EGO gift search lets you bring Hard mode-only gifts into Normal mode.
When going for a certain number of status EGO gifts and playing in normal mode, use the selection to bring Hard mode gifts whenever possible. That way, the total pool of obtainable gifts has gone up and it will be much easier to complete the challenge. This is NOT MANDATORY to complete these achievements, even in normal mode, but it DOES help a lot and in some cases prevents certain theme packs from being mandatory to clear. That being said, searching for theme packs is cheaper than selecting EGO gifts to start with, so if you are low on Starlight, I recommend saving it. These achievements are very doable without it.
Not completely free, though - In normal mode, you WILL have to either have to take specific Theme packs for unique gifts, or use the EGO gift search function in order to complete many of these status achievements.
Other important general notes:
If you fuse EGO gifts together, the product only counts as 1 EGO gift for the achievement. If you are going for these achievements, fusing EGO gifts for the target status will not only lower your total count, but may make it impossible to complete the achievement on a given run, since ingredients for status gifts will NOT reappear if you own a fusion that uses them.
- Take the difficult/abnormality encounters whenever you can. It may increase the length of the run, but getting Cost AND a free EGO gift is better than only getting one or the other.
- If you do happen to find yourself in an event, prioritize options that get you EGO gift quantity. If you gotta fight an abnormality to get 2 gifts instead of 1, it's worth it.
- EGO Gifts do not repeat. Use this to your advantage! If there are only four possible Tier 1 EGO gifts for your status, and you have 3 of them - you are better off trying to obtain that final gift by fusing instead of shop rerolling. Don't be afraid to buy trash EGO gifts in the shop for the sole purpose of fusion, especially when you are close to completing a certain tier of gift. If you select a keyword and the result of a fusion does not show your keyword, that means you have obtained all possible gifts of that Tier that can be currently fused.
- A related point - the results of a recipe fusion will behave as if you still own the ingredients to whatever fusion you made. (All this means is that the results of a fusion cannot be one of the ingredients to that fusion.) This can be useful to help force certain gifts.
- Some EGO gifts can only be obtained in Hard Mode! The wiki is not super clear about this and is also not good about showing which gifts those actually are. This guide's images will always separate out Normal and Hard mode gifts and fusion options.
- Don't spend Cost on rerolling too early. The deeper your run gets, the more trash EGO gifts you will have picked up, and the more likely it is you will be able to obtain what you need by either shop luck, pack rewards, or fusion. The Floor 3 shop is where I will really start to consider my options for rerolling.
- If you are playing on Hard Mode, and you do not have enough EGO gifts on Floor 5, continue playing into Parallel Superposition. Floors 6 - 10 will pull from the same pool of packs as Floor 5, so if you missed an important Theme Pack you will have additional chances to pick it back up. Past Floor 5, you don't have to 'win' - you can forfeit and collect rewards and still complete 'Beat Floor 5+' achievement conditions.
Consider partnering these achievements with the status team loadout achievements, as those naturally fit together and help your run.
Following this guide should make completing these achievements very consistent, even on Normal Mode. If running hard mode all the way to floor 10, getting 3 or even 4 of these achievements in one run is not unreasonable. Either way, I will be writing the following sections as if the player is in Normal Mode and not using gift search, but know that these are options available to you to make things easier, or if you just don't mind spending some extra starlight.
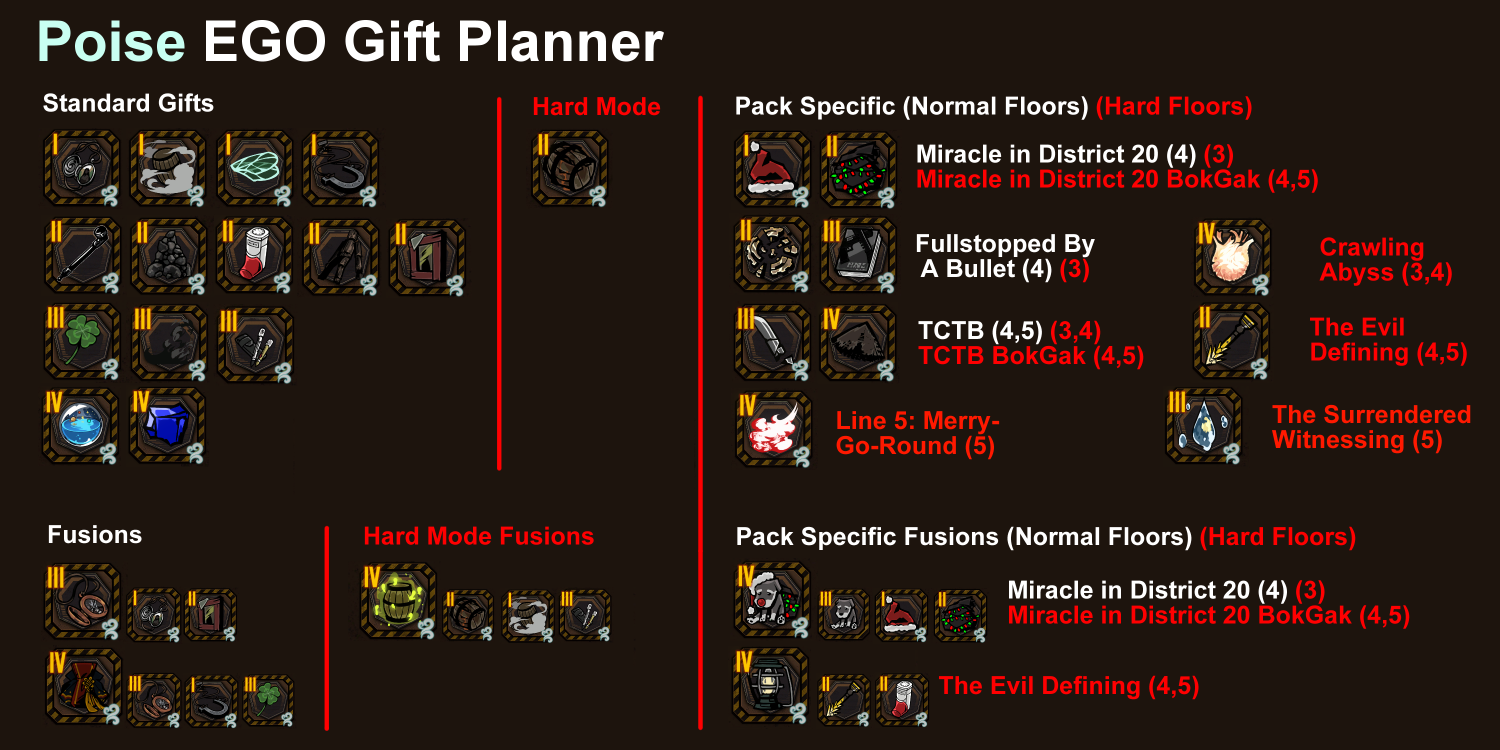
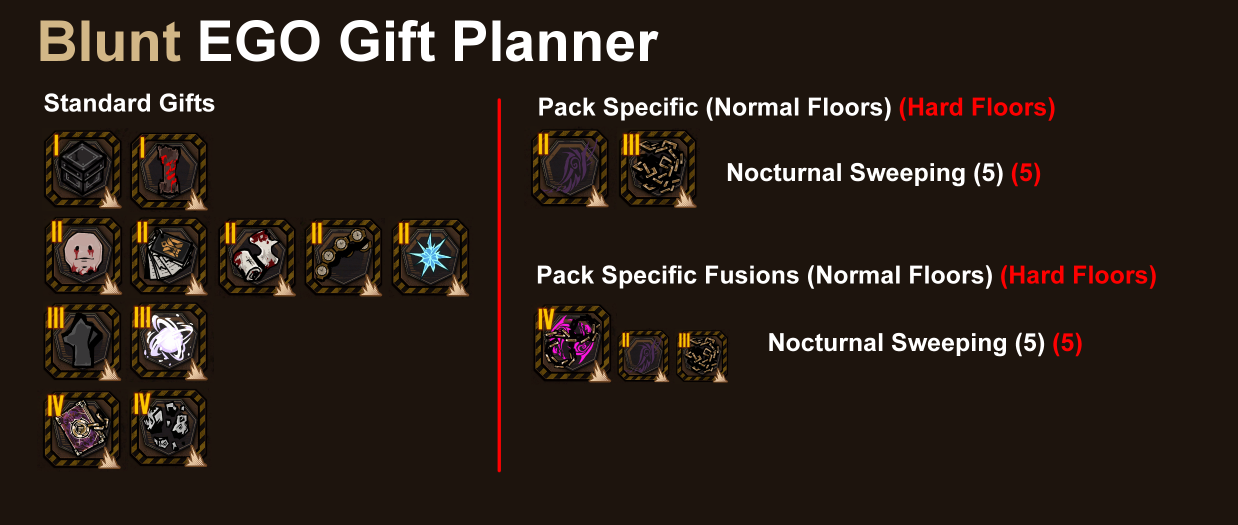
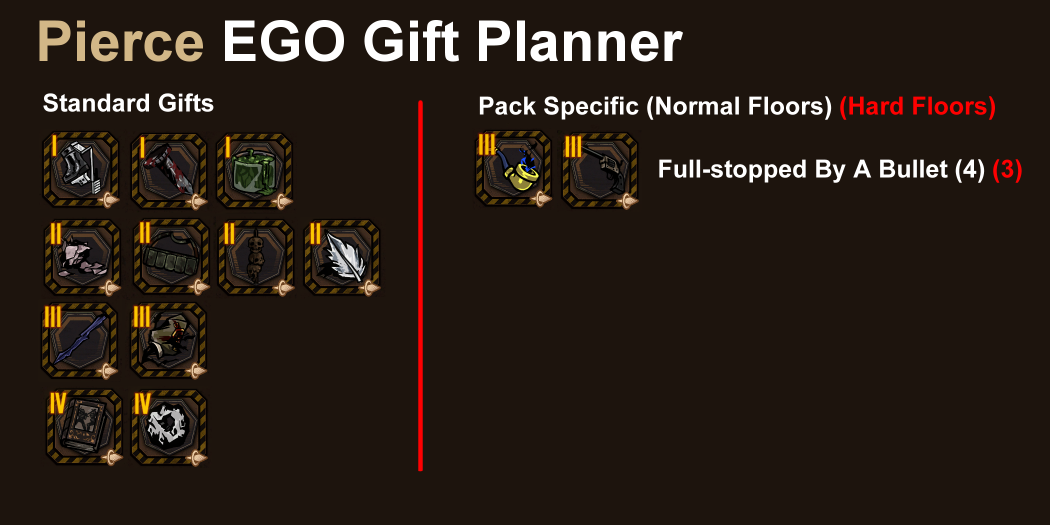
Each image will include several sections: EGO gifts obtainable in Normal Mode (white text), EGO gifts only obtainable in Hard Mode (red text), and EGO gifts that are only obtainable in certain theme packs. There are also fusion sections for each of these categories, while applicable. Theme packs are labeled with two numbers or sets of numbers. Numbers in white are the floors that the pack can appear on in Normal Mode, and red numbers are the floors the pack can appear on in Hard Mode. If a Theme Pack is Hard Mode only, or if the relevant gift for a pack can only appear in Hard Mode, it will appear in red.
15+ Burn
Burn has one of the smallest presences in theme packs, so it's one of the harder ones of these to do in Normal mode.
Prioritize Hell's Chicken for Floor 2 for the unique gift pickup. Even if it's not displayed as a pack reward, this pack's events often will give you the burn gift if you pick a route that hits at a couple of them.
Similarly target LCB Regular Checkup for Floor 5. The gifts here are not super common, especially since they are all Tier 3, so going into this with a decent amount of Cost for shop rerolling, or extra EGO gifts for fusion, will be extremely useful here. Events are once again useful here to potentially land a guaranteed Burn gift. If you've completed this achievement, congrats! It gets smoother from here.

15+ Bleed
From one of the hardest achievements of this type, to one of the easiest! There are so many Bleed EGO gifts that this one is hard to miss.
While focusing on standard EGO gifts is fine, also be aware that each Floor has the possibility for a Theme Pack that may contain a unique guaranteed Bleed gift as a reward, if you are lucky. Be sure to focus of choosing these Theme Packs with unique EGO gift rewards - you can get the standard gifts anytime, so take full advantage of these limited packs!
In Extreme mode, there is an additional Tier 4 Bleed gift dropped in a hidden boss fight, but since the appearance of that fight is RNG, I have left it off this section as it cannot be relied on.

15+ Tremor
Tremor is interesting. Ideally you can pick up the S.E.A. pack on Floor 2, but even if you don't - Timekilling Time is a lategame secret weapon that is incredibly useful. Not only can it show up on two floors, making it very likely you will be able to find it with enough rerolls, the Theme Pack itself is often full of events that also grant Tremor gifts. This is a scenario where I would shift my priority on stage selection to focus on getting as many events as possible.
In Extreme mode, there is an additional Tier 4 Tremor gift dropped in a hidden boss fight, but since the appearance of that fight is RNG, I have left it off this section as it cannot be relied on.

15+ Rupture
It's important to have a strong start with Rupture. Rerolling early for Outcast is nice. I would also recommend Hell's Chicken over S.E.A. for the Floor 2 option when possible. Hell's Chicken is more consistent and often includes an event that will give you the Rupture gift for free.
Picking up Nocturnal Sweeping or Regular Checkup on Floor 5 is a nice backup, but of course you can only choose 1 in normal mode. Either way, be sure to go in with enough cost to get some Rupture rerolls in the shops - if you have lots of rupture gifts already, which you should, this makes it pretty likely for the unique gifts to appear.

15+ Sinking
Sinking is on the easier side of things. The Unloving is a great early option, with Noon of Violet coming late enough that you are fairly likely to be able to fuse into those gifts, as well as the potential pack reward. The layout of Noon is also beneficial with two forced events, which could lead to filling out those extra unique gifts for free. Hatred and Despair is a good backup if Noon doesn't appear, but has less sinking gifts available.
While Dregs of the Manor can appear in Normal Mode, its sinking gift is exclusive to Hard Mode.

15+ Poise
Poise has lots of options here as well, though a few are locked to Hard Mode. Miracle in District 20 is probably more efficient vs Full-stopped By a Bullet, because its Poise gifts are a lower Tier and will be more common to run across and easier to fuse. If neither option shows up, To Claim Their Bones is also available on Floor 4 and will very often include one or both of its Poise gifts as a guaranteed reward. However, prioritize Miracle or Full-stopped for Floor 4, because we can always pick up To Claim Their Bones on Floor 5 as a last resort.
While Crawling Abyss can appear in Normal Mode, its gift is exclusive to Hard Mode.
15+ Charge
Charge shares a similarity with Tremor, in that Murder on the WARP express is a very consistent pack to find and provides a HUGE number of Charge gift options. Noon of Violet is basically a worst case scenario option if you happen to not find WARP on Floor 4, which you should be aiming for every time. (Though in Hard Mode these packs do not conflict.)

10+ Blunt / Pierce / Slash
The damage type achievements are much less intimidating. Blunt is the simplest of these. Even better, Normal Mode has access to the dedicated 'To Be Crushed' and 'Crushers and Breakers' Theme Packs, which are very likely to contain relevant EGO gifts. They are not included on the graphic, but on normal mode look for the first of these packs on Floors 2/3 and the second on Floor 5. On Hard mode, Floors 1/2 followed by Floor 4.
With Nocturnal Sweeping, we got our first pack-specific Blunt Ego gifts. A great way to help get that little extra boost if you are having trouble reaching the 10.
Piercing damage is similarly simple, with even more options. Follow the same Floor layout as mentioned in the previous section to find the 'To Be Pierced' and 'Piercers and Penetrators' Theme Packs. Additionally, Full-stopped by a Bullet can pick up the slack as a mid-run option.
Slashing is the funniest of all of these. It still asks for 10 gifts but has a huge array of additional options thanks to our friends at the Blade Lineage. You can follow the same Floor layout as mentioned in the Blunt section to find the 'To Be Cleaved' and 'Slicers and Dicers' Theme Packs. (You can aim to choose "To Claim Their Bones" on whichever Floor will not conflict with the Slicers and Dicers pack - Floor 4 for Normal, Floor 3 on Hard.)

Tier IV Gift Overview
These achievements got harder, to the point where the highest tiers of these are no longer doable in normal mode. Because of this, I will instead focus on assuming you are playing on Hard mode for these sections.
The achievements are as follows:
Clear with 20+ Tier 4 gifts
Clear with 10+ Fusion-only Tier 4 gifts
Clear with 8+ theme pack Fusion gifts
Important - Lunar Memory and the EX gifts DO NOT count for this; they have their own category of achievement. (But really, you shouldn't be fusing lunar memory on this run anyway, as that's a net loss of tier 4 gifts!)
On the other hand, duplicate tier 4s DO count (for example, if you have a lot of Brilliant Vestiges, you don't need to worry about fusing them into a 'real' ego gift, they will count as they are).
For obtaining tier 4s, using Graces that help with EGO gifts will be very useful, ESPECIALLY upgrading them using starlight.
Specifically:
Chance Comet++ will get you 3 guaranteed tier 4 gifts at various points through a run, and also gets you bonus gifts when you fuse.
Moon Star-shop++ will get you a base 25% chance for a super shop. Ideally, we will be doing all our fusing in super shops because they have a bonus to fusions, making tier 4s cost less materials to fuse. This is a very good pick.
Binary Star-shop++ is very good as well, since it means we can buy more gifts per shop, get more cost per fight, AND make it more likely to randomly find a Tier 4 in a shop.
Perfected Possibility++ will start you with 3 tier 3s which is a